Block DX Trading
Block DX is the fastest, most secure, most reliable, and most decentralized exchange (DEX), built on the Blocknet Protocol. Follow the guides below to learn how to check your balances, select your market, make orders, take orders, check order status, and view order history. If Block DX has not been setup yet, please follow the setup guide.
Acquiring Initial BLOCK
When making a new order (i.e. creating a new offer to buy/sell some asset), there is no Exchange Fee on BlockDX. Therefore, it is possible to acquire BLOCK on the BlockDX exchange, even if you don't currently own any BLOCK. You simply make an offer to buy BLOCK on one of the more liquid trading pairs, like BLOCK/LTC, and wait for someone to take your order (i.e. wait for someone to accept your offer). However, if for some reason you can't wait for someone to accept your maker order to buy BLOCK, there are ways to acquire the small amount of BLOCK you need to pay the Taker Fee:
- Join Blocknet's Discord and ask in the #support or #trading channel if someone would be kind enough to tip you a small amount of BLOCK to get you started trading on BlockDX.
Note: Taker Fee must be paid from the Blocknet core/native wallet; it cannot be paid with BLOCK stored in XLite. Having no BLOCK in your Blocknet core wallet will result in Insufficient Funds error from BlockDX when taking/accepting orders.
For this reason, it's a good idea to keep a few BLOCK in your Blocknet core/native wallet. In a soon-to-be-released version of BlockDX, it will be possible to pay the Taker Fee with BLOCK stored in XLite and it won't even be necessary to run Blocknet core wallet to trade on BlockDX.
Explore Blocknet Network to see how many Service Nodes currently support each digital asset, and much, much more...
Before an asset can be traded on BlockDX, it must be supported by one or more Service Nodes. Blocknet community members have created several web based services to make it easy to discover which assets are currently supported by Service Nodes. Some of these websites actually offer much more information about the Blocknet Network than just how many Service Nodes support each digital asset:
- To list all coins currently supported by Service Nodes for trading on BlockDX, open Tools->Debug Console in your Blocknet wallet and enter:
dxGetNetworkTokens. If using the CLI Blocknet wallet, issue the command,./blocknet-cli dxGetNetworkTokensfrom the directory whereblocknet-cliis kept. - BlocknetMonitor (Thank you @walkjivefly!)
Balances
The first thing you want to do when starting Block DX is to check your balances. Balances displays the connected wallets along with the available balance. A connected wallet is one that has been configured and is currently open and unlocked. The available balance is the balance of the funds in a wallet that are not locked up.
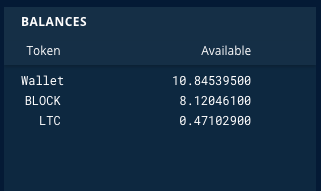
The Available balance may show a value different than what's displayed in the wallet if:
- The wallet is locked.
- You have already made a trade that has locked up funds. You may
want to create smaller inputs so
that a single trade won't lock up more funds than needed. You
can use the
dxSplitAddresscommand from Tools->Debug Console of your Blocknet wallet (or Blocknet CLI) to create smaller inputs. Typehelp dxSplitAddressin the Debug Console to learn how to use it. - Funds aren't in a legacy address. Right now only legacy addresses are compatible. If you are using a Segwit address, please create a new address to send the funds to. If the wallet has been configured via Block DX, then a legacy address will automatically be created when generating a new address.
- The wallet was not configured.
- The wallet was not restarted after the configuration.
- If inputs have been locked via Coin Control.
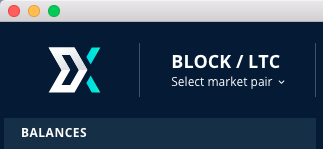
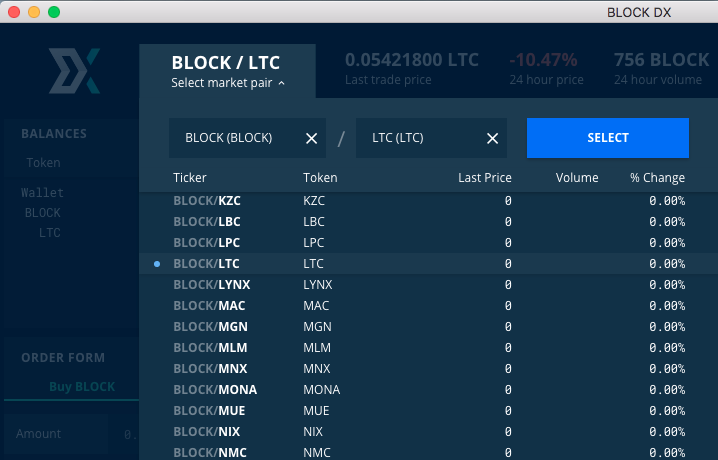
Select Market
-
The market selection tool can be found in the upper-left corned.
-
Click the Select market pair button.
-
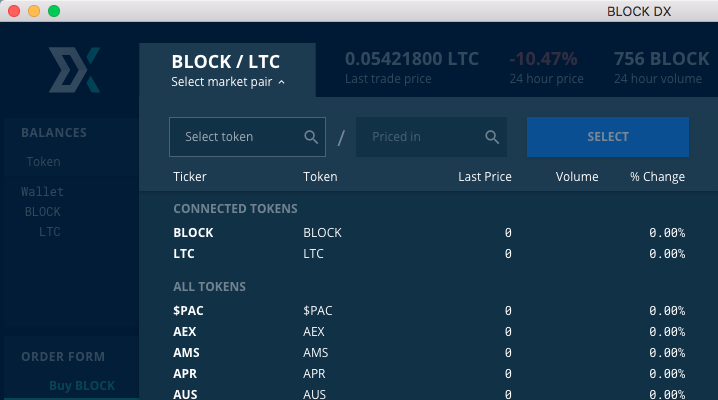
A dropdown menu will appear with two lists: the assets of the wallets you have connected and all assets listed on Block DX.
-
From Connected Tokens, select the asset you would like to trade.
-
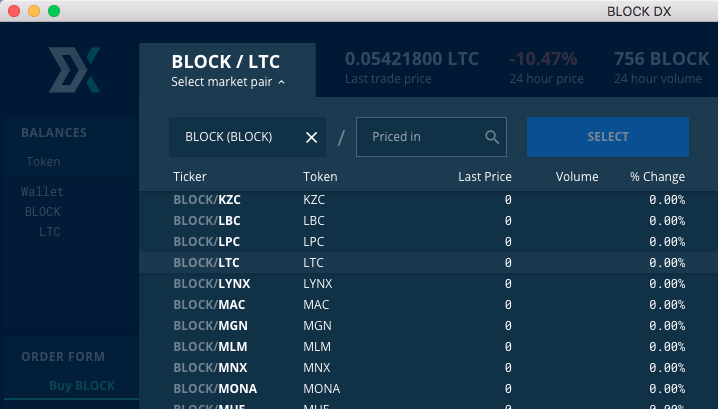
Select the asset you would like to trade the first asset with. The first asset will be priced in terms of this asset. This asset must have a wallet configured.
-
Select Select to view the chosen market.
Market Information
Tip: To view currently active BlockDX orders from a browser, visit BlockNetMonitor
Warning: When opening BlockDX for the first time it can take up to 3 minutes for all currently active orders to display on the screen.
This is simply the nature of a fully decentralized, peer-to-peer network. If your XBridge client is connected to very few peers, it can even take slightly longer than 3 minutes.
Hint: Check your peer count.
-
Redesign Wallet:

-
Classic Wallet:

If your peer count is low, here's how to troubleshoot the issue.
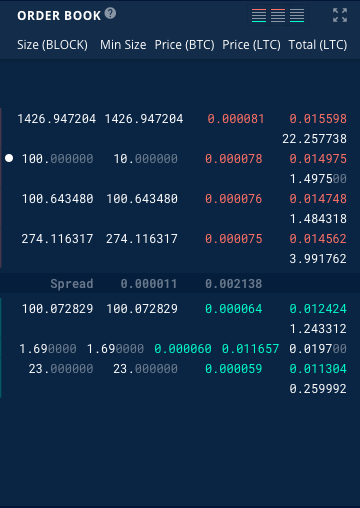
Within BlockDX, each market has a price chart, depth chart, and market stats available.
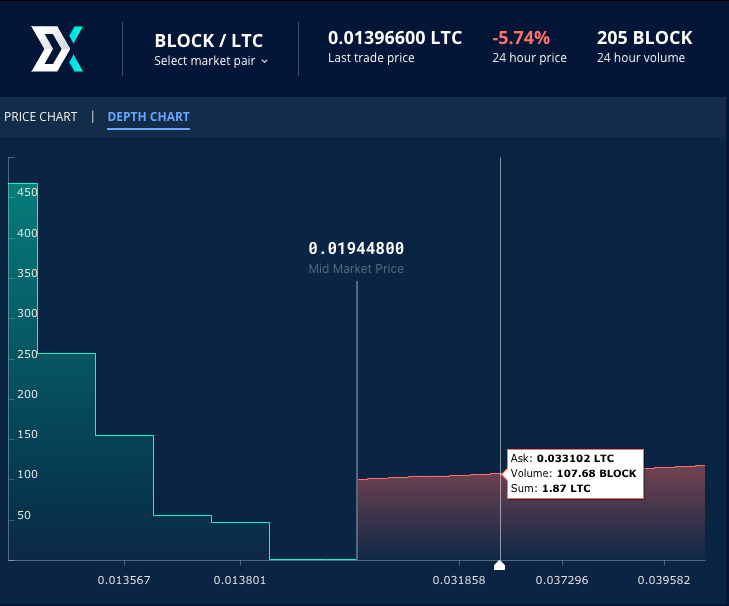
Hover over an area of the price or depth chart to show details corresponding to that point on the chart.
The market stats are above the price chart and show the last trade price, percent in price change over the last 24 hour rolling period, and volume over the last 24 hour rolling period.

The chart has the ability to zoom. To zoom in, click and drag the pointer over the are you want to zoom in on.
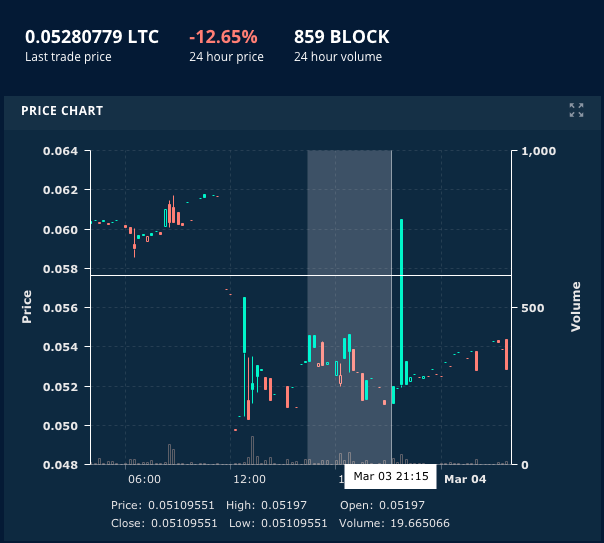
You can hover over the candles to show the information of each data point in the legend.
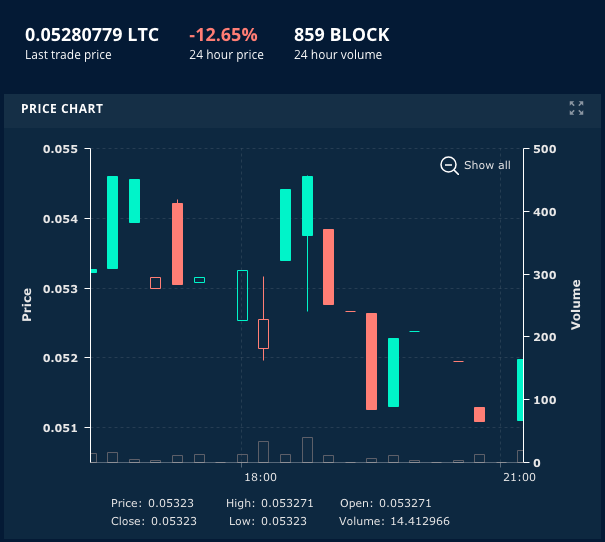
To exit Zoom Mode, select the Show All button in the upper-right corner of the chart.

Make Order
"Making" an order means creating an offer to buy or sell a specified quantity of an asset for a specified price.
- Review the trading fees for making orders.
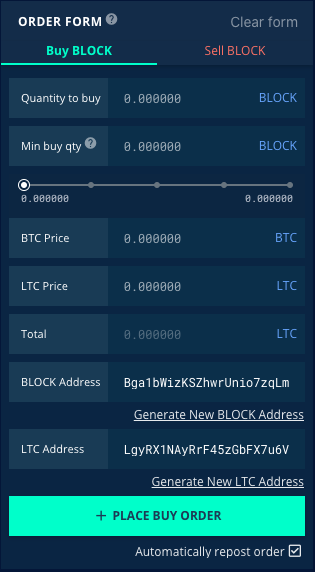
- At the right side of Block DX you will find an order form.
- Select either the buy or sell tab.
- For Quantity to buy/sell (the first input), enter the amount you would like to buy or sell.
-
For Min buy/sell qty (the second input), enter the minimum quantity you are willing to buy/sell in this order.
Warning: When selling an asset with a very high transaction fee (e.g. BTC, ETH), or when funding a purchase with an asset that has a high transaction fee, setting your minimum quantity too small can result in unexpectedly high transaction fees deducted from your wallet. More...
The reason for this is because XBridge might have to prepare the UTXOs of the outgoing asset to facilitate partial fills of your order. It does this by splitting some of your outgoing asset into N UTXOs, where N is approximately equal to the Quantity to buy/sell divided by the Min buy/sell qty. Each of these N UTXOs will contain Min buy/sell qty worth of the outgoing asset. So, one transaction is required for the splitting, then in the worst case, up to N additional transactions may be required to send the N UTXOs of your outgoing asset to each of the counterparties filling part of your maker order. As of this writing, the average BTC transaction fee is USD $28.97. Therefore, if 5 BTC transaction are required to complete your order, the total transaction cost will be USD $144.85! We plan to have a warning message flash in BlockDX itself if a maker order is being set up which might result in very high transaction fees, but we are warning you here in the docs as well. For most assets, transaction fees are negligible, but for certain assets (e.g. BTC, ETH), they are certainly not negligible.
-
For BTC Price (the third input), enter the price (rate) in terms of BTC for which you would like to trade the first asset of the trading pair you've selected. Note, you can optionally enter Price in terms of the second asset of the trading pair you've selected (LTC in the example image above). The field for entering Price in terms of the second asset is just below BTC Price.
- Total shows the total amount of the second asset that will be traded for the first asset.
- In the Address fields, enter the addresses the funds will be going to for each asset. In the above example, buying BLOCK with LTC, the BLOCK Address is the address where the BLOCK you buy will be sent, and the LTC Address is the change address where LTC change from the transaction will be sent. If you don't mind having funds sent to new/empty addresses in your BLOCK and LTC wallets, you can just select Generate New Address to fill in both of these Address fields automatically. However, if you want the asset you're acquiring or the change from the transaction to go to specific addresses in your wallet, you'll need to copy/paste those specific addresses from your wallets into these fields. (For now, these Address fields must be legacy addresses, not Segwit addresses.) See these hints for help finding specific addresses in XLite. Note, the addresses from which the trade is funded are chosen automatically by BlockDX. BlockDX first tries to fund the trade from the address with the smallest UTXO which can cover the expense of the trade.
- If you are placing a partial fill enabled order, which is an order with a Min buy/sell qty less than Quantity to buy/sell, and you want your order to automatically repost whatever portion of the order remains after a partial fill, leave the Automatically repost order checkbox checked.
- Review your order.
- Select the PLACE BUY/SELL ORDER button.
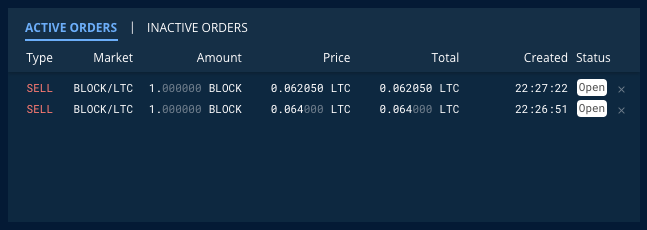
- The trade will now be visible under Active Orders with Open or some specific progress status shown in the Status column.
The Blocknet wallet and the wallets that are being traded out of must remain open and unlocked during trading. If the Blocknet wallet is closed, any open orders will automatically be cancelled.
Take Order
"Taking" an order means accepting an offer to buy or sell a specified quantity of an asset for a specified price.
- Review the trading fees for taking orders. Note: Taker Fee must be paid from the Blocknet core/native wallet; it cannot be paid with BLOCK stored in XLite. Having no BLOCK in your Blocknet core wallet will result in Insufficient Funds error from BlockDX when taking/accepting orders.
-
On the right side of Block DX you will find the order book.
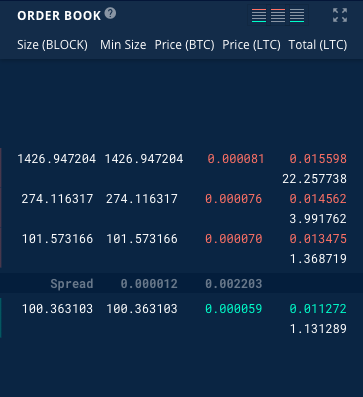
-
Click on the order you would like to take.
-
The ORDER FORM on the right side of Block DX will auto-populate.
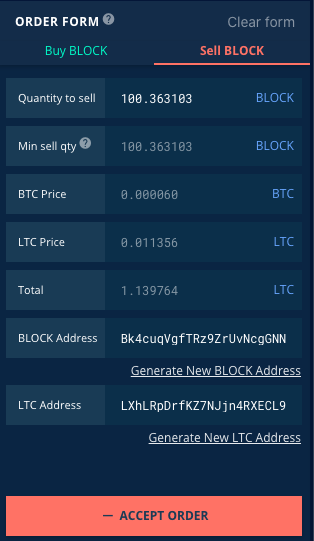
-
If the Quantity to buy/sell field of the ORDER FORM shows a value greater than the Min buy/sell qty field, you can optionally reduce the Quantity to buy/sell value to any value between it's initial value and the value of the Min buy/sell qty field.
- Make sure Balances shows enough Available Balance to cover the order.
- In the Address fields, enter the addresses the funds will be going to for each asset. In the above example, selling BLOCK for LTC, the BLOCK Address is the change address where BLOCK change from the transaction will be sent, and the LTC Address is the address where the LTC you acquire from the sale will be sent. If you don't mind having funds sent to new/empty addresses in your BLOCK and LTC wallets, you can just select Generate New Address to fill in both of these Address fields automatically. However, if you want the asset you're acquiring or the change from the transaction to go to specific addresses in your wallet, you'll need to copy/paste those specific addresses from your wallets into these fields. (For now, these address fields must be legacy addresses, not Segwit addresses.) See these hints for help finding specific addresses in XLite. Note, the addresses from which the trade is funded are chosen automatically by BlockDX. BlockDX first tries to fund the trade from the address with the smallest UTXO which can cover the expense of the trade.
- Review your order.
- Select the ACCEPT ORDER button.
- The trade will now be visible under Active Orders.
The Blocknet wallet and the wallets that are being traded out of must remain open and unlocked during trading. If the Blocknet wallet is closed, any open orders will automatically be cancelled.
Order Status
At the bottom of the screen is the Order Status section, where details can be found about the status of an order:
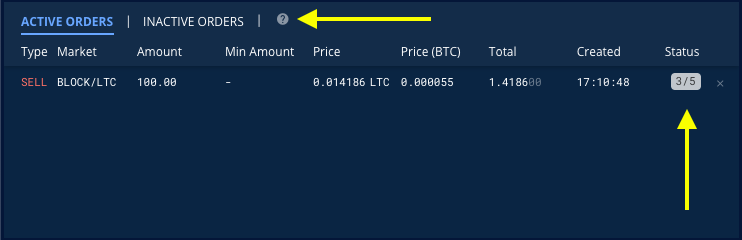
If you hover your mouse over the ? symbol in this section,
you'll see a chart of every possible status an order can have. The
current status is displayed in the Status column on the
right. Here is the list of every possible status an order can have:

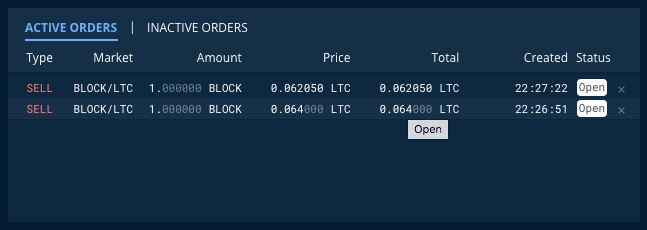
Any orders that are open or in progress can be found in Active Orders.
You can hover over the order to read the order state.
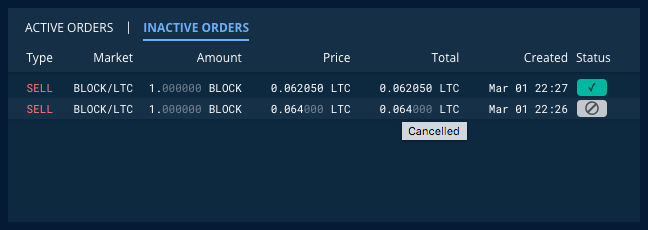
Any orders that are cancelled, completed, or failed can be found in Inactive Orders
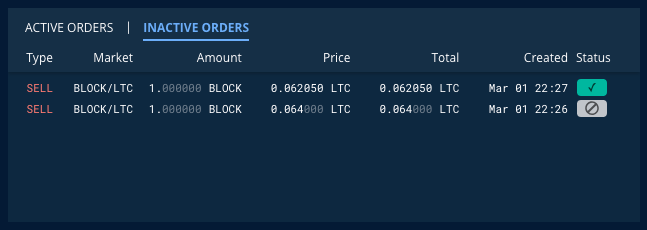
Again, you can hover over the order to read the order state. There are different icons to represent each order state.

If you have created an order, it will be indicated in the order book with a white dot.
The Blocknet wallet and the wallets that are being traded out of must remain open and unlocked during trading. If the Blocknet wallet is closed, any open orders will automatically be cancelled.
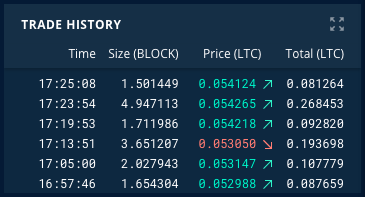
Order History
In the bottom-right area of Block DX you can find the trade history. The trade history information is gathered only for the wallets that are configured. Therefore, the trade history will only show the orders that have been completed since Blocknet wallet and wallets for the currently viewed market have been opened and unlocked. If the Blocknet wallet is restarted, this information will be cleared and no longer visible.
Redeem/Refund Funds from Failed or Cancelled Transactions
Failed/Cancelled Transactions - How to redeem/refund lost funds.
For various reasons, a transaction on BlockDX can occasionally
fail or get cancelled and get listed
under INACTIVE ORDERS as either Failed:
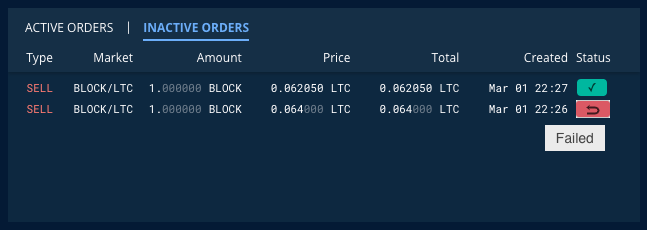 or Cancelled:
When this occurs, BlockDX will attempt to refund both parties in
the transaction for up to 2 hours. In most cases it will
succeed. It's important to keep your Blocknet
core wallet open for 2 hours while the refund is attempted because
the code which manages the refund currently
resides within the Blocknet wallet. In the case of a Failed
Order, if the Blocknet wallet is
closed before all refunds are completed, or in the rare case that
other factors prevent refunds from completing,
the order will continue to display a Failed status as shown
above, but it will be moved from the INACTIVE ORDERS catagory to the
ACTIVE ORDERS category. If this occurs, or if your funds were
not returned after 2 hours from a Cancelled order, you'll need to manually redeem
your funds by issuing a
or Cancelled:
When this occurs, BlockDX will attempt to refund both parties in
the transaction for up to 2 hours. In most cases it will
succeed. It's important to keep your Blocknet
core wallet open for 2 hours while the refund is attempted because
the code which manages the refund currently
resides within the Blocknet wallet. In the case of a Failed
Order, if the Blocknet wallet is
closed before all refunds are completed, or in the rare case that
other factors prevent refunds from completing,
the order will continue to display a Failed status as shown
above, but it will be moved from the INACTIVE ORDERS catagory to the
ACTIVE ORDERS category. If this occurs, or if your funds were
not returned after 2 hours from a Cancelled order, you'll need to manually redeem
your funds by issuing a sendrawtransaction <hexstring> command
as follows:
Manually Redeem Funds
-
Navigate to your data directory:
Windows
Or pasteC:\Users\[YourUsername]\AppData\Roaming\Blocknet\%appdata%\Blocknet\into the File Explorer path field.MacOS
Open Finder and in the program menu select Go > Go to Folder... and enter the above path.~/Library/Application Support/Blocknet/Linux
~/.blocknet/ -
In the data directory there is a
log-txsubdirectory which contain files namedxbridgep2p_YYYYMMDD.log. Thehexstringyou'll need to use as the parameter for thesendrawtransaction <hexstring>command, will be found in one of the most recent of these.logfiles. - Starting with the most recent
.logfile, use a text editor (e.g. NotePad on Windows; TextEdit on Mac) to search these files for information about the failed transaction. Search for text that says either,refund transaction for orderorredeem counterparty deposit for order, followed shortly thereafter by the text,(submit manually using sendrawtransaction), followed by a brief description of the attempted transaction (which will include names of the two coins involved, along with amounts and addresses of each coin), followed by a very large hexadecimal string of over 100 characters. This large hexadecimal string is thehexstringyou're looking for. - If you find two such
hexstringsfor the failed transaction - one after the text,refund transaction for order, and one after the text,redeem counterparty deposit for order, make a note of both of them. - Here is an example of the text patterns you're looking for. In this
example, the transaction was a sale of 24.9 GLC at address Dw7WLmrifyH3KSsrtkXPQmQA8PrTmt6nxS in exchange
for 1.1952 BLOCK at address Brh4VVgQeVtb1A3qroHittKemfDZjSY9Gm:
refund transaction for order 77bb55513d72be752ed68b39980cc2e3e821de0e0318a16a7da131840e1211bf (submit manually using sendrawtransaction) GLC(24.900000 - Dw7WLmrifyH3KSsrtkXPQmQA8PrTmt6nxS) / BLOCK(1.195200 - Brh4VVgQeVtb1A3qroHittKemfDZjSY9Gm) 010000000139602e86db76a93f36293f8b19fbce009fdc68c7f7665cb93e7f37967307e8bd00000000c4483045022100b290e43343728d28dade75719450c8ff338e1431cb51ab05d47e79d76883a16102203f1c493923ed576d7f877470f8be0cc6690f3efe60869346caacd73b0b7d9e9001210399985zb8b14d4e466b89cb2f894c9b24f9c4d9f1fa8585634319ab17bd340ab4514c5663036f1915b17576a914dd4dbb870eeded2f9d4ad18588a470804258185088ac6776a9145779a2aa6ca981f478f6ad18a87e71225558d8d688ad82012188a9149ef2a00e90f13175e306db6d42b60e6c8411869d8768feffffff0181626a94000000001976a9142429537ff322fb00c37cc79aa7a2a1eab3e90dcb88ac6f191500 2021-Mar-19 21:56:19 [0x0x70000a9c4000] redeem counterparty deposit for order 77bb55513d72be752ed68b39980cc2e3e821de0e0318a16a7da131840e1211bf (submit manually using sendrawtransaction) GLC(24.900000 - Dw7WLmrifyH3KSsrtkXPQmQA8PrTmt6nxS) / BLOCK(1.195200 - Brh4VVgQeVtb1A3qroHittKemfDZjSY9Gm) 01000000014adf54bf3256d7ca69570cf2af50c7c2b23de75ceb29788b9bfbbdfdc49fc58100000000e6210216d45a58aadad62fd4b910a2b855434d1d2f2d64a9e08df5bc25503e76f7b46f48304502210090449659a2a430ca3a6c817be506e60f1b443903bc45dd91f5f136b94316148402201141a691fcc2a3ebb61887639ce21982dff95176260c8e79ad4e58e122cbe77401210399985ab8b14d4e466b89cb2f894c9b24f9c4d9f1fa8585634319ab17bd340ab4004c56630367e71cb17576a9145779a2aa6ca981f478f6ad18a87e71525558d8d688ac6776a914dd4dbb870eeded2f9d4ad18588a470804258185088ad82012188a9149ef2a00e90f13175e306db6d42b60e6c8411869d8768ffffffff0100bb1f07000000001976a914fb3aabbc7c8c0c581df57bd57625d72228be700588ac00000000 - The two
hexstringsin the example above are:and010000000139602e86db76a93f36293f8b19fbce009fdc68c7f7665cb93e7f37967307e8bd00000000c4483045022100b290e43343728d28dade75719450c8ff338e1431cb51ab05d47e79d76883a16102203f1c493923ed576d7f877470f8be0cc6690f3efe60869346caacd73b0b7d9e9001210399985zb8b14d4e466b89cb2f894c9b24f9c4d9f1fa8585634319ab17bd340ab4514c5663036f1915b17576a914dd4dbb870eeded2f9d4ad18588a470804258185088ac6776a9145779a2aa6ca981f478f6ad18a87e71225558d8d688ad82012188a9149ef2a00e90f13175e306db6d42b60e6c8411869d8768feffffff0181626a94000000001976a9142429537ff322fb00c37cc79aa7a2a1eab3e90dcb88ac6f19150001000000014adf54bf3256d7ca69570cf2af50c7c2b23de75ceb29788b9bfbbdfdc49fc58100000000e6210216d45a58aadad62fd4b910a2b855434d1d2f2d64a9e08df5bc25503e76f7b46f48304502210090449659a2a430ca3a6c817be506e60f1b443903bc45dd91f5f136b94316148402201141a691fcc2a3ebb61887639ce21982dff95176260c8e79ad4e58e122cbe77401210399985ab8b14d4e466b89cb2f894c9b24f9c4d9f1fa8585634319ab17bd340ab4004c56630367e71cb17576a9145779a2aa6ca981f478f6ad18a87e71525558d8d688ac6776a914dd4dbb870eeded2f9d4ad18588a470804258185088ad82012188a9149ef2a00e90f13175e306db6d42b60e6c8411869d8768ffffffff0100bb1f07000000001976a914fb3aabbc7c8c0c581df57bd57625d72228be700588ac00000000 - Continuing with the example above, assuming the funds which were not
refunded were GLC coin, you could attempt to recover them
manually by opening the GLC core/native wallet, navigating to
the Debug Console, then issuing the command:
where
sendrawtransaction <hexstring><hexstring>is the large hexstring following the text,refund transaction for order. If you want to make sure this recovery attempt will work, you could use a blockchain explorer to explore the transaction of your funds being sent out of your wallet. If you see the output of that transaction shows,not yet redeemedthen you should be able to redeem those funds viasendrawtransaction <hexstring>using thehexstringfound afterrefund transaction for order. - If it's not possible to refund the funds
that were sent out of your wallet, then the counterparty of the
transaction has likely already redeemed/spent those funds. In
this case you can try to redeem the counterparty's deposit. In
the example above, the counterparty's deposit would have been
BLOCK, so to redeem it for yourself, open the BLOCK core/native wallet and issue the
sendrawtransaction <hexstring>command from that wallet's Debug Console (or from the CLI if using the Command Line Interface). This time, the<hexstring>to use will be the one following the text,redeem counterparty deposit for order. -
If you don't have access to the native/core wallet of the coin for which you need to issue a
sendrawtransactioncommand, but that coin is supported by XLite, proceed as follows:-
Open XLite if it's not already open.
-
Record the necessary details for accessing your coin's XLite wallet as follows:
-
Navigate to the CloudChains settings directory:
-
Windows:
Or pasteC:\Users\[YourUsername]\AppData\CloudChains\settings%appdata%\CloudChains\settingsinto the File Explorer path field. -
MacOS:
Open Finder and in the program menu select Go > Go to Folder... and enter the above path.~/Library/Application Support/CloudChains/settings -
Linux:
~/.config/CloudChains/settings
-
-
In a text editor, open the
config-<coin>.jsonfile of the coin you want to redeem. For example, if you need to manually redeem BTC, openconfig-BTC.jsonin a text editor. It will look something like this:{ "rpcPassword": "8vCaDSpOKJ8ZhJdukZxaU4Z4NGFFDa9mPy1b-ZT6tHA", "fee": 0.0001, "rpcUsername": "VMvT5inMA0841-458cOxSgz5V0mxJR8J", "rpcPort": 8332, "feeFlat": true, "rpcEnabled": true, "addressCount": 40, "_ticker": "BTC" } -
Make a note of the
rpcPassword,rpcUsernameandrpcPortvalues in this file. In this example these values are8vCaDSpOKJ8ZhJdukZxaU4Z4NGFFDa9mPy1b-ZT6tHA,VMvT5inMA0841-458cOxSgz5V0mxJR8Jand8332, respectively.
-
-
Open a Terminal window (Mac/Linux) or a Command Prompt (Windows) and issue the following command:
wherecurl -H "Content-Type: application/json" -d '{"method": "sendrawtransaction", "params": ["hexstring"]}' http://rpcUsername:[email protected]:rpcPort/hexstringis the large hexadecimal string mentioned in steps 3-8 above, andrpcUsername,rpcPasswordandrpcPortare the values found in step 9->b->iii above.For example, using the values from the examples above, the
curlcommand would look like this:curl -H "Content-Type: application/json" -d '{"method": "sendrawtransaction", "params": ["010000000139602e86db76a93f36293f8b19fbce009fdc68c7f7665cb93e7f37967307e8bd00000000c4483045022100b290e43343728d28dade75719450c8ff338e1431cb51ab05d47e79d76883a16102203f1c493923ed576d7f877470f8be0cc6690f3efe60869346caacd73b0b7d9e9001210399985zb8b14d4e466b89cb2f894c9b24f9c4d9f1fa8585634319ab17bd340ab4514c5663036f1915b17576a914dd4dbb870eeded2f9d4ad18588a470804258185088ac6776a9145779a2aa6ca981f478f6ad18a87e71225558d8d688ad82012188a9149ef2a00e90f13175e306db6d42b60e6c8411869d8768feffffff0181626a94000000001976a9142429537ff322fb00c37cc79aa7a2a1eab3e90dcb88ac6f191500"]}' http://VMvT5inMA0841-458cOxSgz5V0mxJR8J:[email protected]:8332/Note, Windows users may need to install curl if it is not already installed.
-
Bug: If you used Generate New Address in BlockDX to generate the address to which the asset you just acquired should be sent, and the trade completed successfully but the asset didn't arrive in XLite as expected, click here for instructions what to do.
- Click on Receive in the upper right corner of XLite.
- Select the asset which did not arrive in XLite.
- Click Generate new address until the address to which the missing asset was sent appears in the Your address box.