Syncing the Wallet
Whenever you start the wallet, it must sync with the blockchain. This means that it is downloading all the data (accounts and transactions) on the Blocknet blockchain. This process is required for the wallet to function properly.
Note: Wallet balance may be incorrect until fully synced.
When the wallet syncs, it downloads the data in chronological order. Therefore, if the wallet is not fully synced, it may not reflect recent transactions. This can cause the an incorrect balance to be shown until syncing is finished.
Synchronization
When the wallet is opened, it begins syncing automatically. If this is the first time syncing the wallet or if you haven't opened the wallet in a few weeks, you can use a bootstrap to sync the wallet faster.
To view the syncing status, use the following instructions:
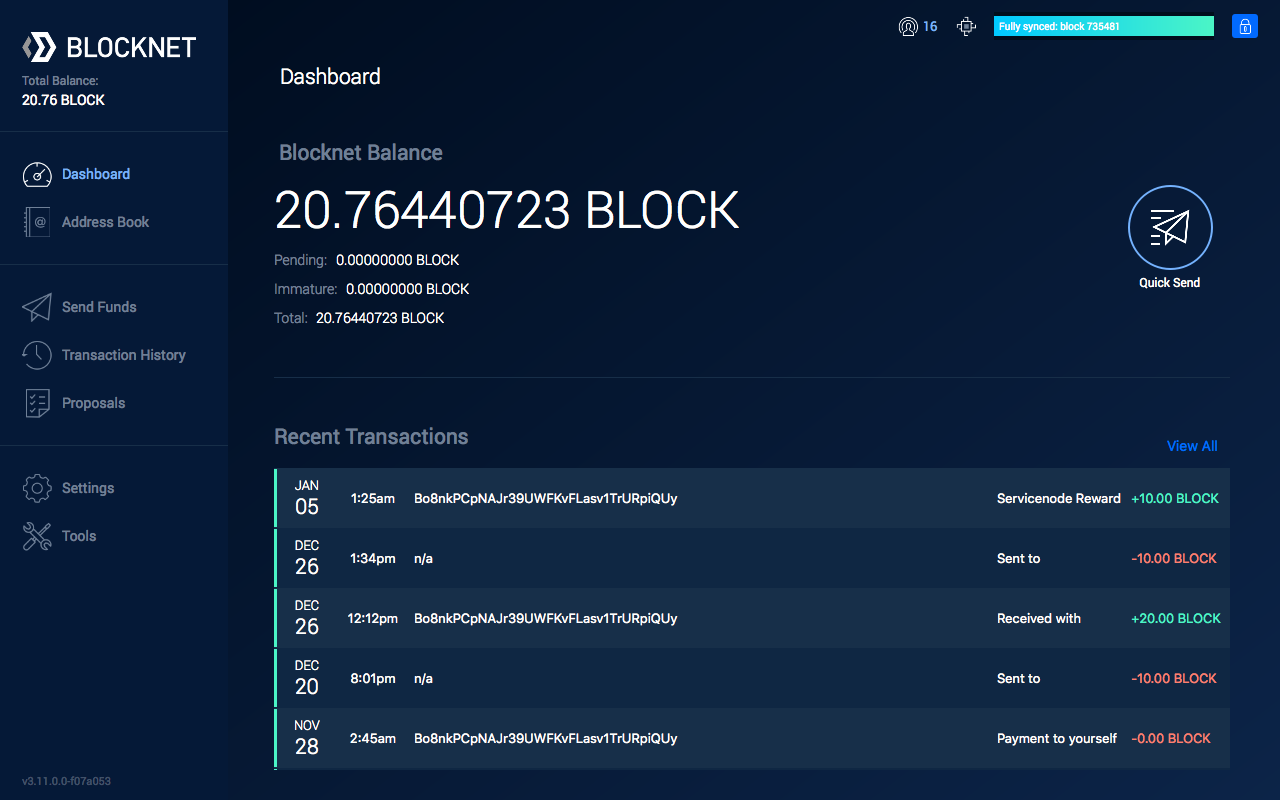
View syncing status using redesigned wallet
-
In the upper-right corner of the wallet you will see a set of icons.

-
The bar shows how far out of sync the wallet is. This is NOT an estimate of how long it will take to sync.

-
After syncing the blockchain data, it will begin syncing other network information.


-
When syncing is complete, it will read Fully synced, followed by the latest block.

-
The left-most symbol is how many peers you have. The number of peer is important because you download the blockchain data from them. If you don't have any peers, you will be unable to sync. When you first start the wallet this number will be low, but will increase after a few minutes. Typically you will have 8-16 peers.

-
If you have 0 peers, make sure your firewall or antivirus software isn't blocking outgoing connections.
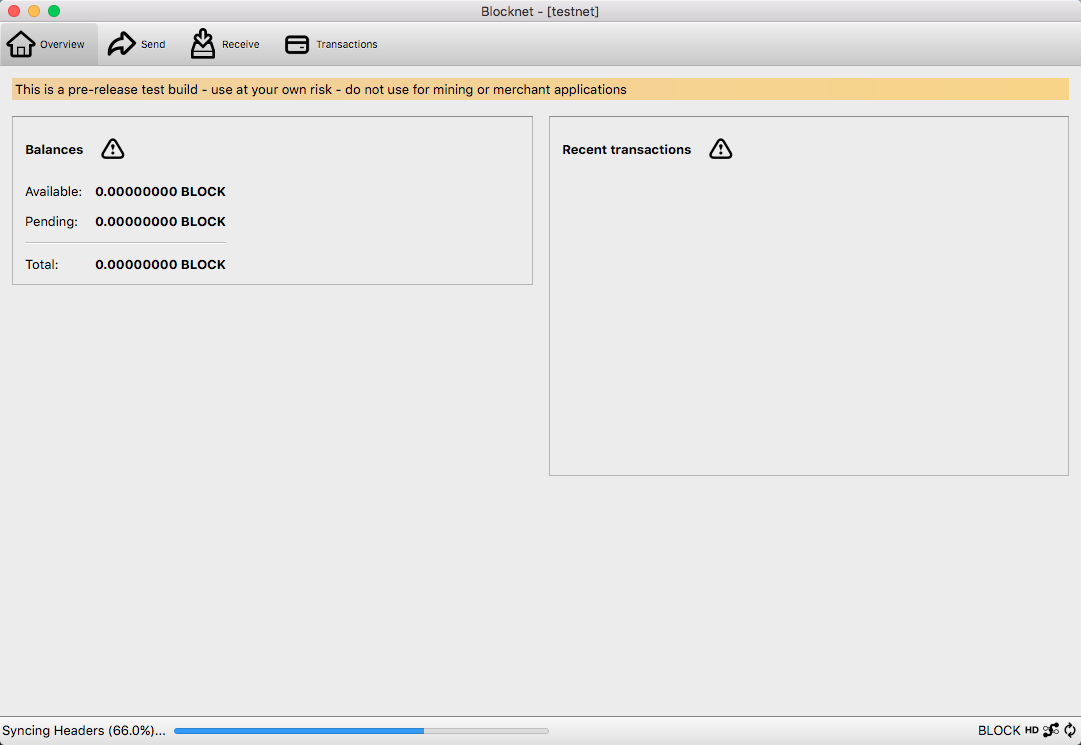
View syncing status using classic wallet
-
At the bottom of the wallet you will see a set of icons.

-
The bar shows how far out of sync the wallet is. This is NOT an estimate of how long it will take to sync.

-
After syncing the blockchain data, it will begin syncing other network information.


-
When syncing is complete, it will read Fully synced, followed by the latest block.
-
Hover over the symbol second from the right to show how many peers you have. The number of peer is important because you download the blockchain data from them. If you don't have any peers, you will be unable to sync. When you first start the wallet this number will be low, but will increase after a few minutes. Typically you will have 8-16 peers.

-
If you have 0 peers, make sure your firewall isn't blocking outgoing connections. This also may be due to antivirus software.
Troubleshoot Syncing Issues
Check Peer Connection Count; Fix No Peers Issue
-
If your wallet fails to sync, first count how many peers it has:
Count Peers in Redesigned Wallet
The left-most symbol is how many peers you have:
Count Peers in Classic Wallet
Hover over the symbol second from the right to show peer connections:
Count Peers in CLI Wallet
In the directory containing
blocknet-cli, issue the command:./blocknet-cli getconnectioncount -
If you have 0 peers, verify your firewall or antivirus software isn't blocking outgoing connections. (Hint: See if you get peers when you disable firewall and antivirus).
- If the Internet connection on your staking computer may have
been unstable, it will be good to see if your wallet has mistakenly banned
peers it shouldn't have banned.
- Check this in the GUI/Qt wallet
by going to Tools->Debug Console and issuing the following command:
listbanned - In the CLI wallet, simply type this in the dir where
blocknet-cliexists:If listbanned shows you have lots of banned peers, it will likely be helpful to issue the clearbanned command../blocknet-cli listbanned - In Tools->Debug Console of
the GUI/Qt wallet:
clearbanned - Or in the CLI wallet, simply type this in the dir where
blocknet-cliexists:If peer banning becomes a recurring problem, you may want to limit the time for which a peer is banned by adding the following line to your./blocknet-cli clearbannedblocknet.conffile, located by default in your Blocknet Data Directory:Then restart your Blocknet wallet for the new bantime to take effect.bantime=180
- Check this in the GUI/Qt wallet
by going to Tools->Debug Console and issuing the following command:
-
- Quit/Close your wallet
- Navigate to your data directory:
- Windows
Or paste
C:\Users\[YourUsername]\AppData\Roaming\Blocknet\%appdata%\Blocknet\into the File Explorer path field. - MacOS
Open Finder and in the Go menu select Go to Folder... and enter the above path.
~/Library/Application Support/Blocknet/ - Linux
~/.blocknet/
- Windows
If, after verifying neither firewall nor antivirus nor banned peers is blocking outgoing connections, you still have 0 peers, try adding peers manually:
- Open the
blocknet.conffile in your data directory with a text editor (e.g. Notepad for Windows; TextEdit for Mac). - Find a list of active peer nodes to add:
- Navigate in a browser to Chainz Blocknet Explorer Network Page:
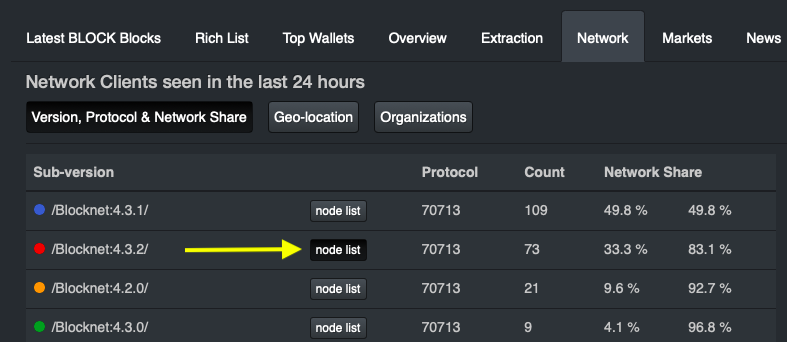
- Click on node list next to the wallet version you are
running:
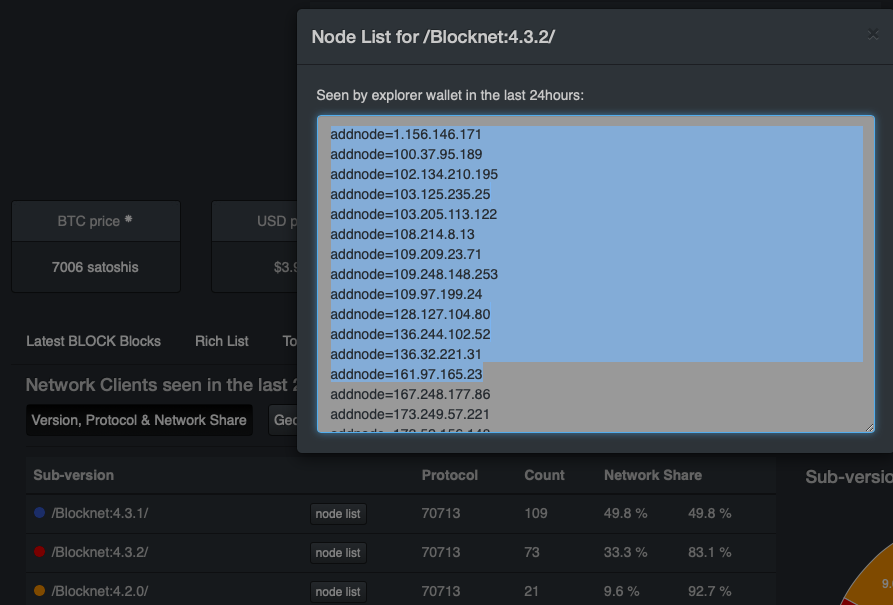
- Select at least 12
addnode=xxx.xxx.xxx.xxxstatements and copy them into the clipboard
- Navigate in a browser to Chainz Blocknet Explorer Network Page:
- Paste the contents of the clipboard into your
blocknet.conffile and save the file. - Reopen your Blocknet wallet.
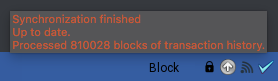
Syncing Halts Unexpectedly
Occasionally, even when there are plenty of peer connections, a wallet will get stuck while syncing the blockchain. When this happens, syncing simply stops on a particular block and doesn't continue beyond that block. When this happens, it is often possible to resume syncing progress with the following procedure:
- Open Tools->Debug Console.
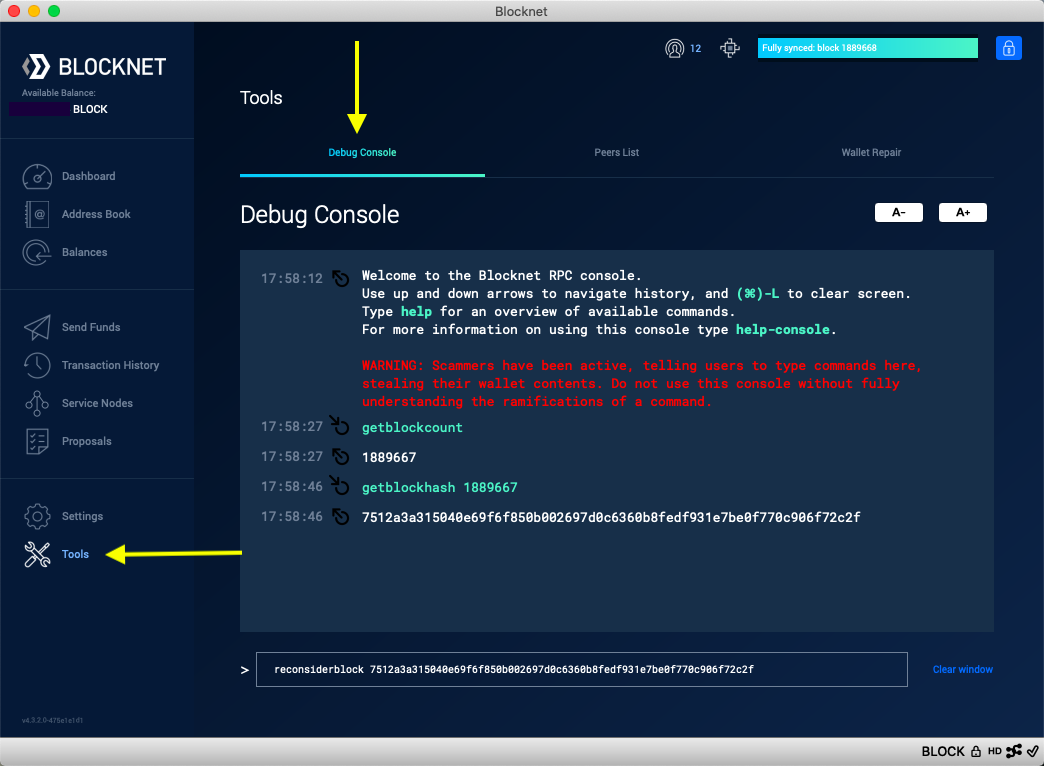
- In the Debug Console, type
getblockcount - Select & copy the blockcount returned by that command into the
clipboard (
1889667in the example above). - Type the command,
getblockhash <blockcount>where<blockcount>is pasted into the Debug Console from the clipboard. - Select & copy the blockhash returned by that command into the
clipboard (
7512a3a315040e69f6f850b002697d0c6360b8fedf931e7be0f770c906f72c2fin the example above). - Type the command,
reconsiderblock <blockhash>where<blockhash>is pasted into the Debug Console from the clipboard. - When you've finished issuing these three commands, your Debug Console should look something like the screenshot above. Notice how the number returned from the first command is used in the second command, and the number returned from the second command is used in the third command.
- After issuing these three commands, wait a couple minutes to see if your wallet resumes syncing.
- If it doesn't resume syncing, Quit/Close your wallet and try the bootstrap procedure.
- If the Bootstrap procedure also fails, see the Troubleshooting instructions below for getting help from the Blocknet Discord Server.
Note: If using the CLI wallet, the same three commands given above can be issued through the Command Line Interface.
Troubleshooting
If you encounter issues, please join Blocknet's Discord and ask a question in the #support channel.
Warning: Beware of scams
Be cautious of users sending you private messages on Discord to help with troubleshooting, even if they claim to be team members. Scammers will often prey on those having issues and offer help in an attempt to steal funds. This is usually done by impersonating team members.
Bootstrap
A bootstrap is a set of files containing blockchain data up to a certain point in time. Using these files helps shorten the amount of time it takes to sync the wallet since you don't need to sync the blockchain from scratch.
- Install the wallet or update to the latest release.
- Download the latest bootstrap files.
- Find the downloaded
Blocknet.zipfile. The default location is in your Downloads folder. - Double-click the file to unzip and reveal a folder named
Blocknet. - Close and quit the Blocknet wallet if it is running.
-
Navigate to your data directory:
Windows
Or pasteC:\Users\[YourUsername]\AppData\Roaming\Blocknet\%appdata%\Blocknet\into the File Explorer path field.MacOS
Open Finder and in the program menu select Go > Go to Folder... and enter the above path.~/Library/Application Support/Blocknet/Linux
~/.blocknet/ -
Remove all files and folders EXCEPT for
wallet.dat,blocknet.conf,xbridge.conf,xrouter.conf,servicenode.conf, and thewallets/folder (you may not have all these files). Again, DO NOT delete thewallet.datfile orwallets/folder as it contains the private keys for your funds. Deleting these will result in loss of funds. - Inside the downloaded
Blocknetfolder there are theblocks/,chainstate/, andindexes/folders. Move these 3 folders into the Blocknet wallet's data directory that you just removed files from. - Start the wallet and syncing should begin at the bootstrap's last block.
- Read more about syncing above.