Wallet Installation
Installing the Blocknet wallet is a simple process. Below are step-by-step instructions for how to install the wallet on each operating system (OS).
- For a complete guide on setting up the wallet, see the setup guide.
Upgrade Wallet
Upgrading: If you already have the Blocknet wallet installed and you're upgrading to the latest version, click here for instructions.
Before upgrading your Blocknet wallet to the latest version,
close/quit/stop the Blocknet wallet app. If running the CLI
wallet, issue the command, ./blocknet-cli stop to stop the
blocknet daemon.
Upgrading your wallet from version 4.0 or greater to the latest version is basically the same as installing the wallet from scratch. The differences are:
- When installing the upgrade version, your operating system may ask you to approve the replacement of your old Blocknet wallet app with the new one. (Select "OK" or "Replace")
- When running the upgrade version for the first time, you won't be prompted for an installation data directory as you were on initial installation.
- When running the upgrade version for the first time, you don't have to sync your wallet from scratch like you did on initial installation.
- When running the upgrade version for the first time, you won't have to encrypt your wallet as you did on initial installation."
To upgrade from Blocknet wallet version 3.x, follow this guide.
Redesigned vs Classical GUI/Qt wallet
Tip: There are two wallet variations.
There are two wallet variations, a redesigned interface (default) and a classic interface. To use the classic wallet, you'll need to open your blocknet.conf file and add classic=1 on a new line (you may not have a blocknet.conf file and will need to create one). You can find the blocknet.conf file in your Blocknet data directory:
- Windows
Or paste
C:\Users\[YourUsername]\AppData\Roaming\Blocknet\%appdata%\Blocknet\into the File Explorer path field. - MacOS
Open Finder and in the Go menu select Go to Folder... and enter the above path.
~/Library/Application Support/Blocknet/ - Linux
~/.blocknet/
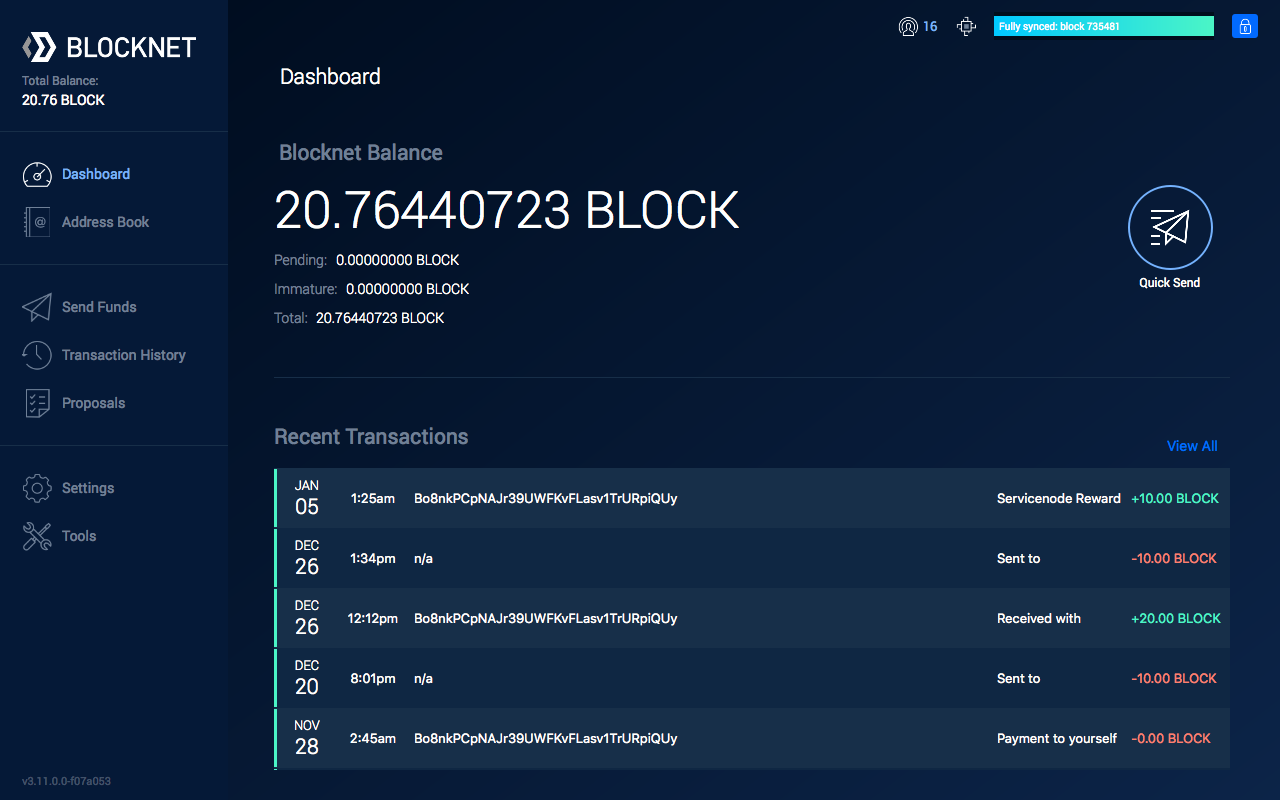
Redesigned Wallet (default)
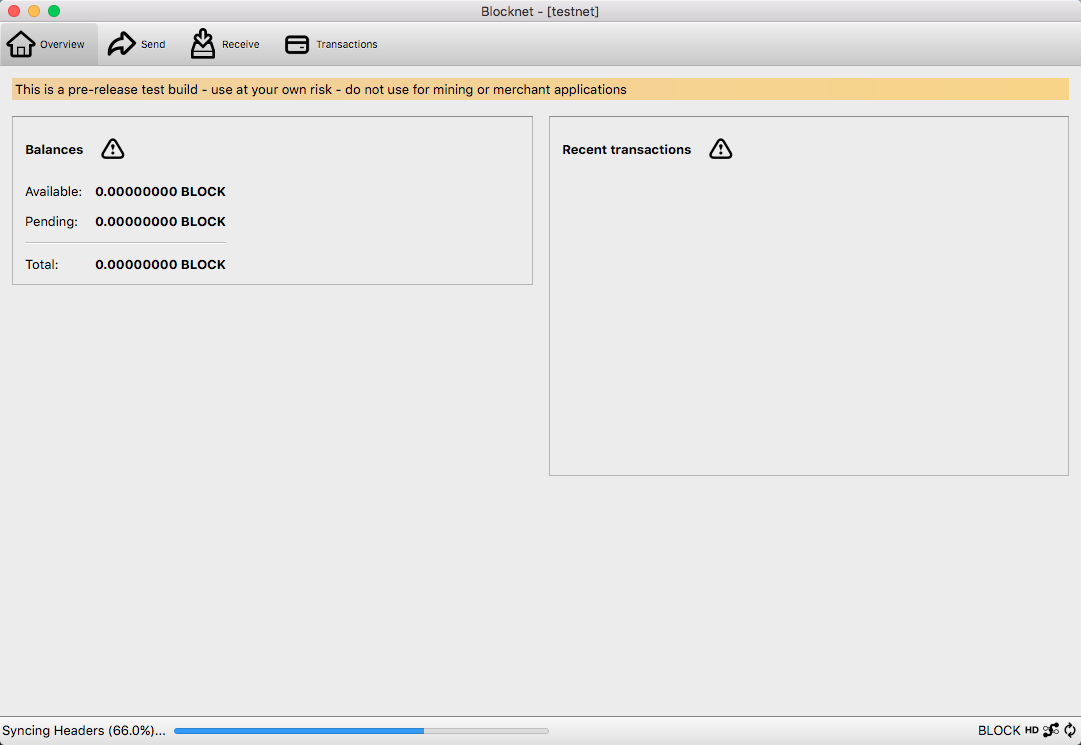
 Classic Wallet
Install GUI Wallet
Windows

-
Download the latest Blocknet wallet. There are 2 options:
blocknet-x.xx.x-win64-setup-unsigned.exe(recommended for 64-bit)
-
blocknet-x.xx.x-win64.zipNote: Antivirus software may be flagged
It is normal for antivirus software to flag the wallet as potentially dangerous. This is a common issue with most wallets, including Bitcoin's. As long as the wallet was downloaded from https://blocknet.org, Blocknet's Github or Blocknet's XLite Github, it can be deemed as safe and the warning can be ignored. You may need to temporarily disable antivirus download protection to complete the download. You can read more about this issue here: https://bitcoin.org.
-
Before continuing, it is recommended to verify your download
- Continue to the instructions below for the download you selected:
Using the .exe download (option a)
- Find the downloaded file. The default location is in Downloads.
-
Double-click the file to begin the installation process.
Note: You may receive antivirus warning messages.
You may recieve warnings from antivirus software. These false positives are normal and can be dismissed.
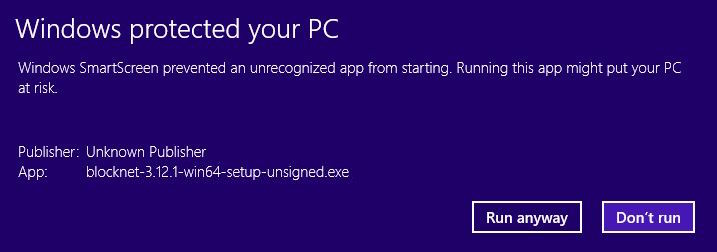
If you have Windows SmartScreen enabled, you may see the following message:
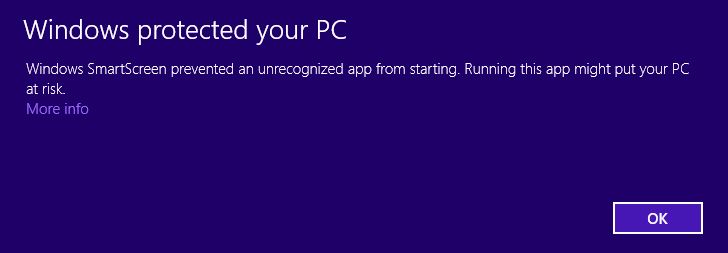
Select More info, then Run anyway to dismiss this message:
-
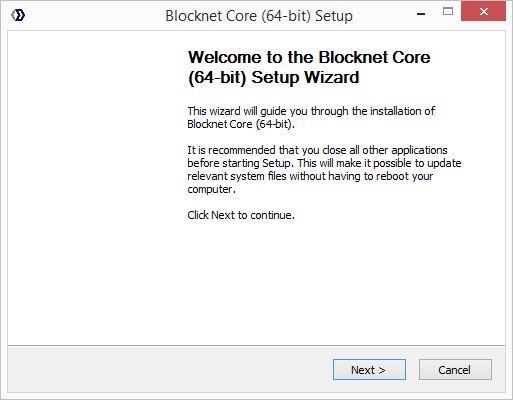
The installation guide will appear, select Next.
-
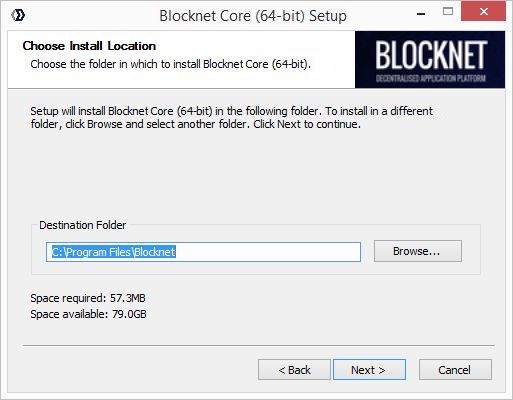
Select Next to accept the default installation directory.
-
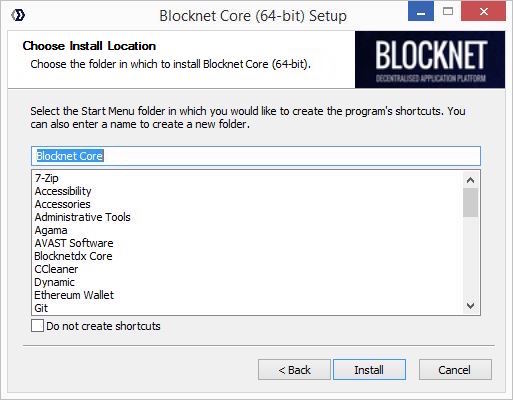
Select Install to accept the default data directory folder name and begin installation.
-
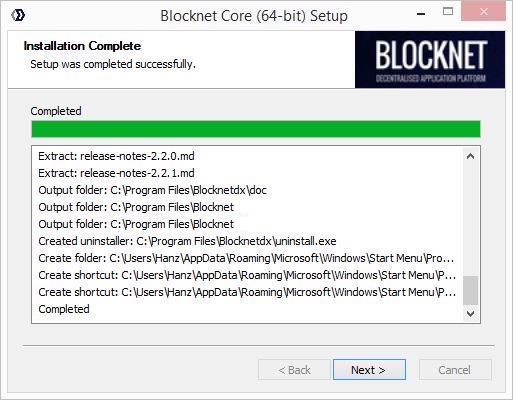
Select Next when the installation is complete.
-
Select Finish to complete the installation process. If you would not like the wallet to open right away, uncheck the Run Blocknet option.

Installation Complete!
Continue to related guides:
Using the .zip download (option b)
- Find the downloaded file. The default location is in Downloads.
-
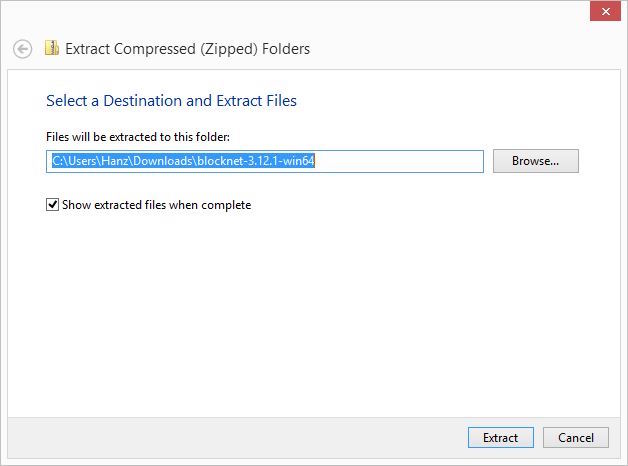
Right-click the file, select Extract All.
-
Select Extract.
-
After the files are extracted, a new folder should open with the contents. If a folder did not open, look for the new folder in the directory the downloaded file is located.

-
In this new folder there will be another folder. Double-click on this sub-folder to view the contents.
- In this folder there will be a
bin/folder. Double-click on this sub-folder to view the contents. -
Here you will find the
blocknet-qtexecutable file.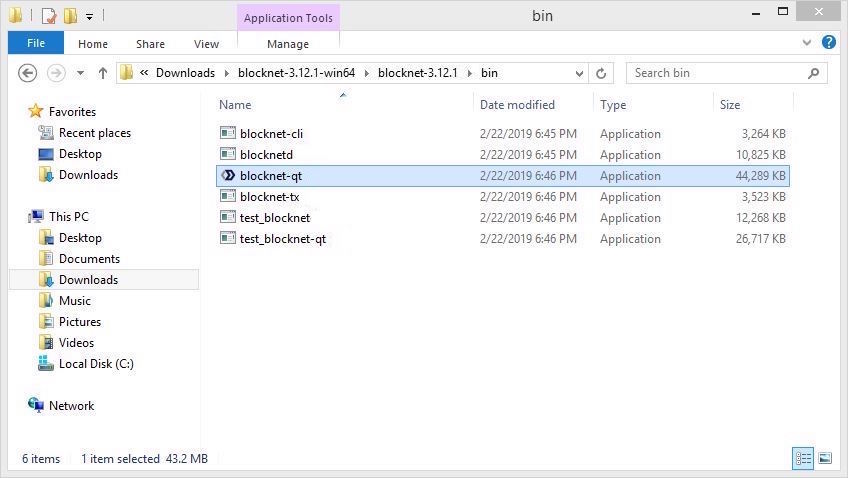
-
Move this file you where you keep your applications, such as your Desktop. Additionally, you can right-click and Pin to Start or Pin to Taskbar for easy access.
- After moving this file, the files you downloaded can be deleted since the
blocknet-qtexecutable file is all that is needed. -
Double-click the
blocknet-qtfile to begin the installation process.Note: You may receive antivirus warning messages.
You may recieve warnings from antivirus software. These false positives are normal and can be dismissed.
If you have Windows SmartScreen enabled, you may see the following message:
Select More info, then Run anyway to dismiss this message:
-
The installation guide will appear, select Next.
-
Select Next to accept the default installation directory.
-
Select Install to accept the default data directory folder name and begin installation.
-
Select Next when the installation is complete.
-
Select Finish to complete the installation process. If you would not like the wallet to open right away, uncheck the Run Blocknet option.
Installation Complete!
Continue to related guides:
MacOS
-
Download the latest Blocknet wallet. There are 3 options:
blocknet-x.xx.x-osx-unsigned.dmg(recommended)
-
blocknet-x.xx.x-osx-unsigned.tar.gz -
blocknet-x.xx.x-osx64.tar.gzNote: Antivirus software may be flagged
It is normal for antivirus software to flag the wallet as potentially dangerous. This is a common issue with most wallets, including Bitcoin's. As long as the wallet was downloaded from https://blocknet.org, Blocknet's Github or Blocknet's XLite Github, it can be deemed as safe and the warning can be ignored. You may need to temporarily disable antivirus download protection to complete the download. You can read more about this issue here: https://bitcoin.org.
-
Before continuing, it is recommended to verify your download
- Continue to the instructions below for the download you selected:
Using the osx-unsigned.dmg download (option a)
- Find the downloaded file. The default location is in Downloads.
- Double-click the file to begin installation.
-
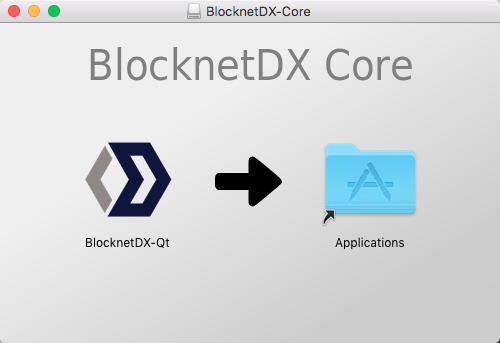
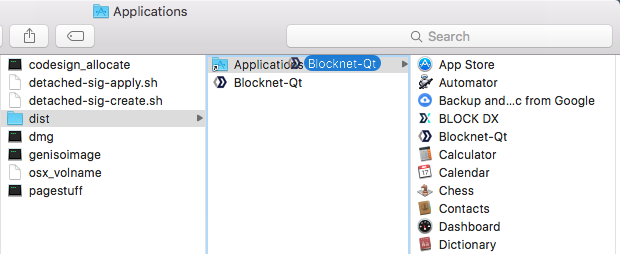
Click and drag the Blocknet-Qt application icon over to the Applications folder and release.
-
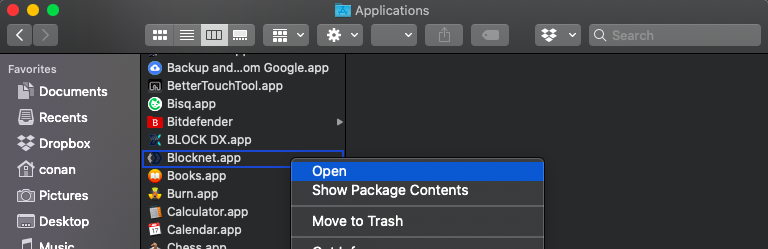
Open Finder, navigate to Applications, and find Blocknet.app in the list of applications.
-
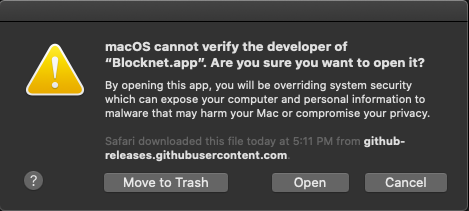
Right-click the file and select Open. If using the touch pad this can be done by clicking with 2 fingers.
-
If you are prompted with a message asking if you are sure you want to open the application, select Open.
Note: If you see a message like the one below instead of the one above, click Cancel and repeat step 5 above.
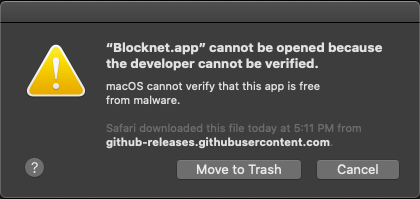
Tip: If nothing happens when you try to open the Blocknet App...
Try turning off any anti-virus "File Shiled" programs. For example, Avast Free anti-virus has 3 core shields. Only the "File Shield" has to be turned off.
-
Your computer will begin verifying the application. This may take a few minutes to complete.
-
An installation prompt will appear, select OK.
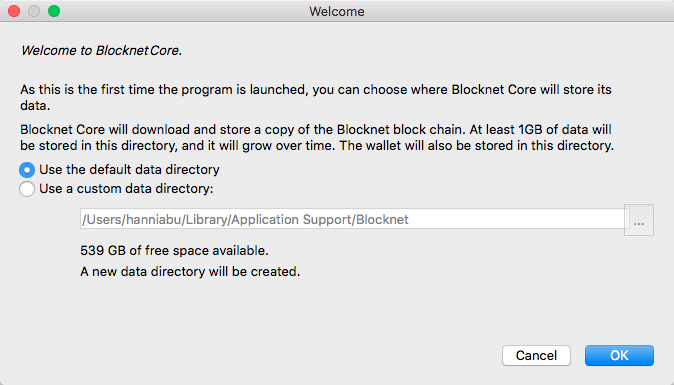
Installation Complete!
Continue to related guides:
Using the osx-unsigned.tar.gz download (option b)
- Find the downloaded file. The default location is in Downloads.
- Double-click the file to unpack the contents.
- In the newly unpacked folder, navigate to the dist folder.
-
Click and drag the Blocknet-Qt application over to the Applications folder and release. This will add the wallet to Applications.
-
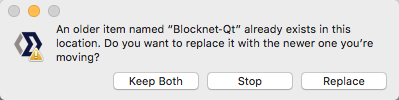
If you are prompted with a message asking if you would like to replace an existing version with a newer version, select Replace.
-
The downloaded files may now be removed.
- Open Finder, navigate to Applications, and find Blocknet-Qt in the list of applications.
-
Right-click the file and select Open. If using the touch pad this can be done by clicking with 2 fingers.
-
If you are prompted with a message asking if you are sure you want to open the application, select Open.
Note: If you see a message like the one below instead of the one above, click Cancel and repeat step 8 above.
Tip: If nothing happens when you try to open the Blocknet App...
Try turning off any anti-virus "File Shiled" programs. For example, Avast Free anti-virus has 3 core shields. Only the "File Shield" has to be turned off.
-
Your computer will begin verifying the application. This may take a few minutes to complete.
-
An installation prompt will appear, select OK.
Installation Complete!
Continue to related guides:
Using the osx64.tar.gz download (option c)
- Find the downloaded file. The default location is in Downloads.
- Double-click the file to unpack the contents.
- In the new folder created, navigate to the
bin/folder. - Double-click the
blocknet-qtfile. -
If you are prompted with a message asking if you are sure you want to open the application, select Open.
Note: If you see a message like the one below instead of the one above, click Cancel and repeat step 4 above.
Tip: If nothing happens when you try to open the Blocknet App...
Try turning off any anti-virus "File Shiled" programs. For example, Avast Free anti-virus has 3 core shields. Only the "File Shield" has to be turned off.
-
Your computer will begin verifying the application. This may take a few minutes to complete.
- Since this is a command line executable file, a command-line window will appear to start the wallet, which begins the installation process.
-
An installation prompt will appear, select OK.
Installation Complete!
Continue to related guides:
Linux
-
Download the latest Blocknet wallet. There are 2 options:
blocknet-x.xx.x-x86_64-linux-gnu.tar.gz(recommended for 64-bit)
-
blocknet-x.xx.x-arm-linux-gnueabihf.tar.gz(recommended for Raspberry Pi)Note: Antivirus software may be flagged
It is normal for antivirus software to flag the wallet as potentially dangerous. This is a common issue with most wallets, including Bitcoin's. As long as the wallet was downloaded from https://blocknet.org, Blocknet's Github or Blocknet's XLite Github, it can be deemed as safe and the warning can be ignored. You may need to temporarily disable antivirus download protection to complete the download. You can read more about this issue here: https://bitcoin.org.
-
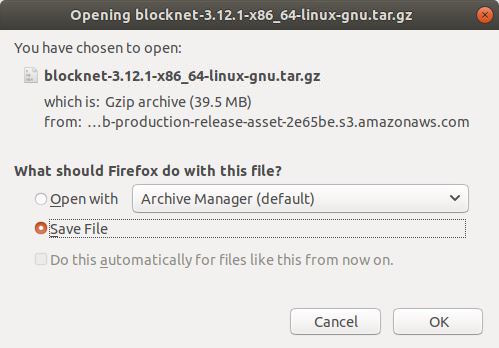
You may be asked for a confirmation to download, select Save File then OK.
-
Find the downloaded file. The default location is in Downloads.
- Before continuing, it is recommended to verify your download
-
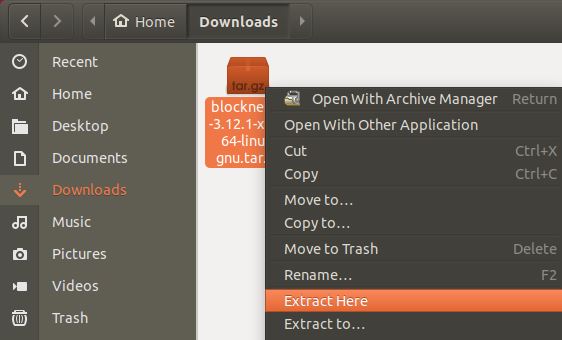
Right-click the file, select Extract Here.
-
Double-click the
blocknet-x.xx.x-x86_64-linux-gnu/folder to view the contents. - Double-click the
blocknet-x.xx.x/folder to view the contents. - Double-click the
bin/folder to view the contents. -
Here you will find the
blocknet-qtexecutable file.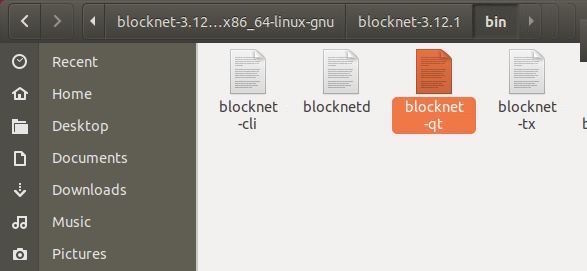
-
Move this file you where you keep your applications, such as your Desktop.
- After moving this file, the files you downloaded can be deleted since the
blocknet-qtexecutable file is all that is needed. - Double-click the
blocknet-qtfile to begin the installation process. (If it fails to open on double-click, you may need to give executable permission to the file: Eithersudo chmod +x blocknet-qtin Debian terminal, or Right-click property, give executable permission.) -
An installation prompt will appear, select OK.
Installation Complete!
Continue to related guides:
Install CLI Wallet on Linux
See Staking from CLI on a VPS running Ubuntu Linux
Verifying Downloads
It is important to verify the integrity of downloads before running them. Depending on how you downloaded it, it's possible the file may have been modified in transit to do something evil when run. The server hosting the download may also have been compromised.
- Get the sha256 hash of the release you download. These are provided on the Github release page either in a file called
sha256sums.txtor as a plain text in the release notes. The format followsSHA256(filename)= hash. Here is an example of the hashes:SHA256(blocknet-3.13.1-arm-linux-gnueabihf-debug.tar.gz)= 77e6c3e5d1e6ef9f0d54a8f0fe3d638b1c6bd889e609c6a69bb8f82322117847 SHA256(blocknet-3.13.1-arm-linux-gnueabihf.tar.gz)= 94705029ebf05b0aa2b0939dd0da0663e578accbf5dca8e9393456d9d40edde6 SHA256(blocknet-3.13.1-i686-pc-linux-gnu-debug.tar.gz)= 30039c5eb3951a73d578f613d072a79610cb3983113cf816fbed485ce44bd57c SHA256(blocknet-3.13.1-i686-pc-linux-gnu.tar.gz)= c5c9013b5e0539a99825339f98a460281014b3dca5d970e24faa860b6fd0c0e7 SHA256(blocknet-3.13.1-osx-unsigned.tar.gz)= 0d5be3dedc83521349b5def54c1f045f1cd35c67d8da5beb50c90beaa50ae659 SHA256(blocknet-3.13.1-osx64.tar.gz)= 438b0b82001ca5ce0af8300061207f87421c3c9cfeab47dd4c56ebc856b357da SHA256(blocknet-3.13.1-win-unsigned.tar.gz)= 1f81058be74d3714f1e07f5b16562f471cd2da1fac8251b3c3d414dba5b0d271 SHA256(blocknet-3.13.1-win32-debug.zip)= fdc15df95dbb1293d59a2a9b90bf421594b0dc27320cd09cf31dcc9073bb2a8e SHA256(blocknet-3.13.1-win32-setup-unsigned.exe)= c89200719d3e55f9f7eee1cf8f77a4a4c43d8c4551b896a4f0d7617a935f31e0 SHA256(blocknet-3.13.1-win32.zip)= 60c0805f00fe4e1c1e93af2ef3e93fb0fbe3b7bcf2385f8192c1a176b4068c3f SHA256(blocknet-3.13.1-win64-debug.zip)= e739bf19e5d826ff9750c9ae9dfddf0bf17b9e6da2d90e094698c02171454a6f SHA256(blocknet-3.13.1-win64-setup-unsigned.exe)= 350d67cdb009a7b4d3101dae145caa9c69e8c7a2ca6252a4d97aedf33a5a3f9d SHA256(blocknet-3.13.1-win64.zip)= f1f472353f034e1151345c167a48a01d1ceafdd2b7a5b7a5cc82df9cbef6ce6d SHA256(blocknet-3.13.1-x86_64-linux-gnu-debug.tar.gz)= 998fa0487cc4e8fc2be9fb004cd6eb9bc0e91d690da110a5073e3f3b50bd2938 SHA256(blocknet-3.13.1-x86_64-linux-gnu.tar.gz)= 9608a66feb4616092ddb2dbeeafef01f5c0c28b61cccf13bcd032cee3981be74 - Take a note of the hash for the specific file you downloaded.
-
Get the sha256 hash of the file you downloaded:
Windows
- Open the command prompt.
- Navigate to the location of the downloaded file.
- Enter
certUtil -hashfile filename SHA256withfilenamereplaced by the name fo the file you downloaded.
Example:
certUtil -hashfile blocknet-3.13.1-win64.zip SHA256MacOS
- Open the terminal.
- Navigate to the location of the downloaded file.
- Enter
shasum -a 256 filenamewithfilenamereplaced by the name fo the file you downloaded.
Example:
shasum -a 256 blocknet-3.13.1-osx-unsigned.tar.gzLinux
- Open the terminal.
- Navigate to the location of the downloaded file.
- Enter
sha256sum filenamewithfilenamereplaced by the name fo the file you downloaded.
Example:
sha256sum blocknet-3.13.1-x86_64-linux-gnu.tar.gz -
Compare the release hash to the hash of the download. If the hashes do not match, DO NOT run the file and delete the file immediately.